
Flashing is the thin, impervious material that closes the weak points shingles and membranes can’t seal. It’s a critical component of any roofing system because it helps direct water, shed water, and prevent water from getting into the assembly.
When flashing is wrong, water intrusion follows, then rot, staining, and leaks. The failures are rarely random. They concentrate at roof intersections, along the roof edge, around chimneys, vent stacks, skylights, and near any window or wall transition where walls intersect the roof plane. Good flashing doesn’t look “fancy.” It looks clean, layered, and purposeful-because the job is simple: keep water moving to the exterior.
Roof flashing basics on a finished roof
On a finished roof, roof flashing should look quiet and controlled. Straight lines along the roof line. Flat metal that sits tight to the surface. A consistent lap that follows the drainage direction. No ripples, no buckles, no jagged cuts, and no random holes that don’t belong.
The “looks right” test matters because the visible work often reflects what you can’t see. If the metal is wavy, it usually means it wasn’t fastened evenly or the deck edge is uneven. If the seams are stepped or split, the seam was formed under stress or the metal was forced into position. Those are early warning signs.
Flashing also needs to match the way water behaves. Water doesn’t politely fall straight down. Wind pushes rain sideways. Snow melt crawls under edges. Ice dams back water uphill. That’s why good flashing details focus on overlap, slope, and a clean exit path. When flashing is done right, it doesn’t “fight” water. It guides it.
One more practical check: the upper edge of most flashing should be protected by another layer above it. If you can see a top edge exposed where water can run behind it, you’re relying on sealant alone. Sealant fails. Layering lasts.
Common flashing details: where leaks start first
Most leak calls are not caused by a “bad shingle.” They’re caused by weak transitions. These are the common flashing details where water concentrates, joints multiply, and small mistakes become repeated leaks.
Start with geometry. A valley concentrates runoff from two planes into one flow line. A wall intersection forces water to change direction. Penetrations like pipes and vent stacks create a hole in the roof surface. Chimneys add masonry joints, corners, and movement. Skylights and window areas add trim, framing, and extra seams.
Then add movement. The roof expands and contracts. Walls move differently. Metal expands faster than wood. Those stresses show up at laps and fasteners first. When the detail is wrong, water gets a shortcut into the building.
This is why roof flashing details are often underrated. Done correctly, they protect the entire building envelope. Done poorly, they turn a small edge issue into structural repairs inside the structure.
Critical zones and why flashing belongs there
- roof edge / fascia
- valley / valley flashing
- step flashing at walls
- vent stacks / pipes
- chimneys
- skylights / window zones
- parapet wall / wall flashing
- transitions (for example tile, slate, metal roof)
Valley flashing and water flow control
A valley is where two sloped planes meet in a V-shaped channel. That’s why valleys fail when shortcuts are taken. The flow is heavier, faster, and more constant than on open field shingles. Leaves and grit settle there. Water backs up easier. During storms, overflow pressure increases.
Valley flashing gives water a controlled surface that resists capillary pull and nail holes. The width matters because it gives water room to stay on metal instead of hunting for seams. The overlaps matter because they keep water from finding a reverse path. The “centerline” needs to stay clear so water doesn’t ride up under the shingle edge.
A good valley detail also respects the system around it. Underlayment should feed into the valley, not terminate short. Shingles should be cut cleanly, with no ragged edges that catch debris. Where the manufacturer calls for it, seams are sealed or reinforced with tape, but the detail should still work even when sealant ages.
If you’ve ever seen a stain that appears only after heavy rain, a valley is a prime suspect. A small gap at a lap might hold during light rain, then fail under high volume. Valley flashing is not the place to “save” material.
Roof edge protection – drip edge done right
The edge of a roof is a harsh zone. Wind-driven rain hits it first. Water clings and curls under edges. Wood edges swell. Trim rots.
That’s why drip edge exists. Drip edge flashing is an L-shaped piece of metal along the roof edge that directs water away from the fascia and the adjacent wall and into the gutter. When it’s missing or installed wrong, you often see peeling paint, soft fascia boards, and stained soffits.
A correct edge detail starts at the roof deck. The deck edge should be straight and solid. The drip edge should be attached tightly without gaps, and it should be fastened in a pattern that holds under wind without turning the edge into a line of leak points. Too many exposed holes in the wrong location is a problem, especially if fasteners land where water runs.
Integration matters too. Underlayment needs to overlap in a way that makes water run out, not in. In practice, that means the upper materials should guide water onto the metal and then off the metal. If the edge is tucked backward, water can run behind the metal and wet the deck edge repeatedly.
This is a small detail with big consequences. A failing roof edge can look “minor” outside while slowly soaking the roof structure inside.
Wall flashing at roof-to-wall transitions
Any time a sloped roof meets a wall, you get competing paths for water. Gravity pulls water down. Capillary pull can drag it sideways. Wind can push it uphill. If the detail lets water run into the wall, the building loses.
Wall flashing works when it sends water out over the drainage plane. It does not work when it tries to “seal” water inside the wall. That is the main decision point. You want a detail that sheds water to the exterior surface and keeps the wall assembly dry.
This is also where movement matters. The roof moves. The adjoining wall moves differently. A good flashing design allows those two parts of the structure to expand and contract without ripping open the waterproof layer. That’s why counter pieces and layered laps exist. They protect the top edges and let parts move independently.
If a wall intersection keeps leaking, look for these common issues: flashing turning inward, siding trapping the top of the metal, missing kickout at the bottom, or gaps where the wall finish meets flashing. A wall detail should never create a pocket that holds water. The detail must have positive slope to the exterior and a clear exit path.
Step flashing: the wall-and-shingle layout that holds up
Step flashing is not optional at a typical roof-to-wall shingle transition. It’s the standard approach because it matches how shingles work: layered pieces that overlap so water always has a downhill route.
Step flashing uses small, shingle-like metal pieces that interleave with each shingle course. Each piece runs under the shingle and turns up the wall behind the siding. This is how you create a stair-step water path that stays reliable even when materials shift.
Where step flashing fails, it’s usually because someone tried to simplify it. A long continuous strip doesn’t match shingle layering. It cracks at movement points. It forces sealant to do the heavy lifting. It also tends to trap water at the wrong spot.
A complete wall junction also needs the “exit” detail at the bottom. Kickout flashing is placed at the bottom of a roof-wall intersection to direct water away from the wall and into the gutter. Skip it and you often get rot behind trim and staining down the wall face.
Typical step flashing mistakes
- one long piece instead of step-by-step pieces
- wrong lap (too short or facing the wrong direction)
- fasteners placed in the water path
- missing kickout at the bottom of the wall intersection
- missing or incorrect counter flashings
- using sealant as the “system” instead of proper layer overlap
- reversing the over-under order
- ignoring thermal movement (metal loosens and damages fasteners)
Head flashing for openings: what keeps trim from rotting?
Openings are water magnets. Even when the roof surface is fine, water can get behind trim at dormers, sidewalls, and skylight curbs. That’s why head flashing exists.
Head flashing directs water away from openings such as windows and doors. On a typical window, the flashing approach is a set: cap or head at the top, jamb pieces at the sides, and sill flashing at the bottom. Each piece feeds water outward onto a drainage surface. The goal is no trapped water and no reverse laps.
This is also where “looks okay” can still fail. A cap flashing that ends short can dump water into the side trim. A head piece with the wrong bend can create a pocket that holds water against wood. A top edge that isn’t protected can allow wind-driven rain to run behind the flashing.
Skylights are similar. Many skylight leaks are not glass leaks. They are flashing failures at corners, seams, or the curb-to-roof transition. If a skylight keeps leaking after “resealing,” that’s a sign the core detail is wrong. Reseal isn’t a substitute for proper overlap.
Chimneys and parapet wall flashings that don’t forgive mistakes
Chimneys are one of the most failure-prone roof details. They combine corners, masonry joints, multiple seams, and movement. Chimney flashing is a multi-part system because a single strip can’t do the job.
At minimum, you’re dealing with base flashing that integrates with shingles and a protective layer of counter flashings that covers the upper edges. Counter flashing is used to prevent water infiltration where a sloped roof transitions to a higher vertical plane. That’s exactly what a chimney is. Without counter flashing, water can get behind the base metal, especially during heavy rain and freeze/thaw cycles.
A parapet wall detail often faces the same problem: roof plane up to vertical, then exposure along the top. If the top isn’t protected, water gets in. If seams aren’t sealed properly, the wall can soak from the inside. That moisture can travel and show up far away from the original entry point.
These areas also show why relying on caulk is a bad plan. Chimneys and parapets move. Sealant stretches, cracks, and separates. Layered metal details hold because water still flows outward even after minor aging.
Metal flashings, materials, and what actually lasts
Most metal flashings are made from galvanized steel or aluminum. Copper is used when long life and corrosion resistance justify the cost. You also see rubber or metal collars on penetrations. A vent pipe collar, often called vent pipe flashing, fits around plumbing or HVAC pipes penetrating the roof to create a watertight seal.
Material choice is not just about price. It’s about compatibility and environment. Dissimilar metals can trigger galvanic corrosion when moisture is present. That problem is slow, but it’s real. You might not see it for years, then suddenly seams fail and fasteners loosen.
Thermal movement matters too. Metal expands and contracts. Over time, movement can loosen screws, enlarge holes, and open joints. That’s why good details use clips or cleats where needed and avoid locking long runs of metal in a way that guarantees stress.
On a metal roof, movement is more pronounced. Long panels expand. Fasteners must be chosen and placed correctly. The flashing design needs to account for that movement so joints don’t tear open.
If you want a simple rule: pick corrosion-resistant materials, follow manufacturer thickness guidance, and don’t mix metals casually. Flashing isn’t décor. It’s the part that protects everything under it.
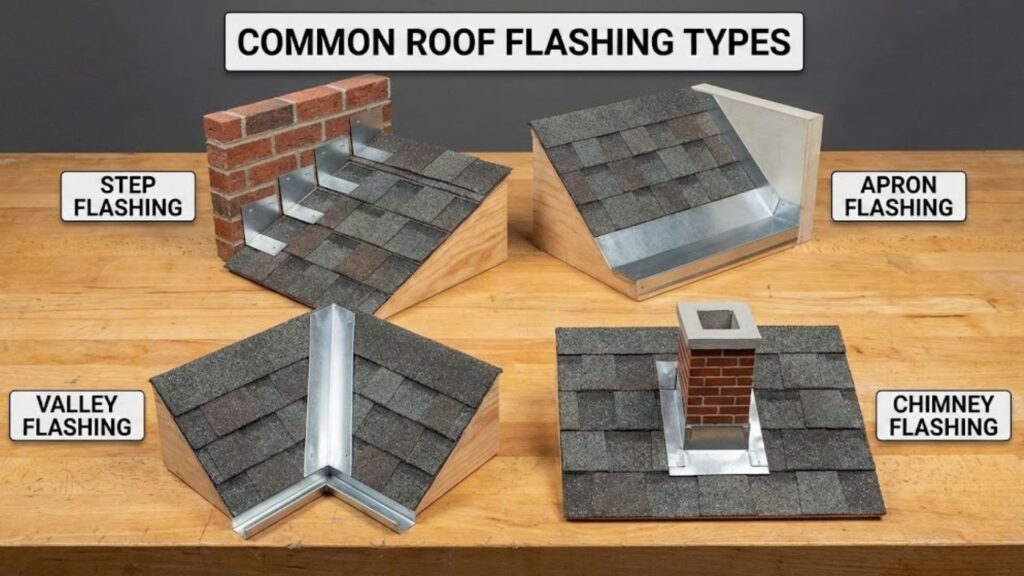
Types of flashing on one page
- drip edge (roof edge)
- step flashing
- valley flashing
- vent pipe flashing (collar around pipes / vent stacks)
- chimney flashing + counter flashings
- head flashing (windows/doors)
- kickout flashing (bottom of roof-to-wall)
- wall flashing / parapet wall transitions
Flashing installation: deck-to-finish method that prevents callbacks
A reliable installation is not “put metal here.” It’s a step-by-step process that starts at the roof deck and ends with a final water path that cannot send water back into the wall.
First, the substrate matters. The deck must be solid, clean, and flat enough for metal to sit tight. If the roof deck edge is uneven, drip edge will wave. If the deck is soft, fasteners will loosen and holes will enlarge.
Second, order matters. The top edges of many pieces go under underlayment, while the upper pieces overlap the lower pieces. This is the over-under rule in action. It’s not a preference. It’s the only way water keeps moving outward under real weather.
Third, sealing is selective. Joints and seams should be formed well first, then sealed or reinforced with tape where the system calls for it. Do not treat sealant as the primary waterproofing method. Overlap is primary. Sealant supports the overlap.
Fourth, fasteners must be placed like you expect water to be aggressive-because it is. Fasteners should be limited in wet zones. They should be placed where water does not sit. They should be compatible with the metal to avoid corrosion. If you create a line of holes along a water channel, you’re creating future leaks.
Fifth, drainage is the finish line. Flashing must always direct water out over the cladding or drainage plane. It must not create openings that allow water to be directed back into the wall. That is the difference between a roof detail that lasts 15-30 years and one that fails early.
Installation checklist (general order)
- inspect the deck/roof deck and the edge condition
- underlayment: upper runs overlap lower runs
- confirm positive slope to the exterior
- install lower components first (drip edge, bottoms of transitions)
- keep lap aligned with drainage direction
- limit penetrations and keep fasteners out of water paths
- treat joints: correct seam, and where required, tape and keep it sealed
- allow thermal movement (clips/cleats where appropriate)
- route water onto the outside surface, not into a wall
- final check after rain and during freeze/thaw or snow periods
Roof flashing repairs and when to call a pro
Flashing problems have patterns. Inside, you see stains that appear after rain, bubbling paint, or soft drywall. In the attic, you see dark wood, wet insulation, or daylight at a joint. Outside, you may see lifted edges, rust, cracked sealant, or a split seam.
Minor repairs make sense when the design is correct and only a local piece failed. A loose vent collar can be reset. A small seam can be reworked and sealed. A damaged section near the lower edge can be replaced. But repeated leaks at the same detail usually mean the underlying layering is wrong.
If step flashing was replaced with one continuous strip, you’re not going to “caulk” your way out of it. If a chimney lacks counter pieces, water will keep getting behind the base metal. If the roof edge is installed backwards, the deck edge will stay wet. In those cases, rebuilding the detail is cheaper than chasing the damage inside the structure.
Call a pro when you see multiple symptoms, when leaks recur after a “repair,” or when details involve chimneys, parapet wall transitions, or complex roof intersections. Those areas require correct sequencing, correct metal work, and fastener placement that respects movement. The cost of doing it right is usually less than the cost of repairing the building envelope later.
FAQ
How should roof flashing look?
Roof flashing should look flat, straight, and intentional along the roof line-no waves, gaps, or lifted edges. Laps run with the drainage direction, seams stay tight, and the upper edge isn’t left exposed where water can run behind it. You should not see random extra holes from fasteners in wet zones. If it looks sloppy, the hidden roof flashing details and flashing details are usually sloppy too, which raises the risk of water intrusion and leaks.
What are common step flashing mistakes?
The most common step flashing mistakes are using one long strip instead of layered pieces, flipping the lap order, and putting fasteners where water flows. Another major miss is skipping kickout at the bottom of the roof-to-wall intersection, which lets runoff soak the wall and trim. People also forget counter flashings or rely on caulk instead of proper layer overlap. The result is repeat leaks at roof-to-vertical wall transitions and at other roof intersections.
How should roof flashing be installed?
Flashing should be installed with a simple rule: upper pieces cover lower pieces, and water always exits to the exterior. The top edge of many details tucks under underlayment, while the next upper parts overlap the lower edge and the piece below. Seams are formed correctly and then sealed or backed with tape only where the system requires. Fastening follows code and avoids creating open pathways for water into the roof deck or back into the wall.
Should flashing go over or under shingles?
Both-depending on the part of the detail. Many flashing pieces tuck under the underlayment at the top edge, but the face of the flashing must overlap the shingle courses below so water can shed water outward. With step flashing, each piece sits with the shingle layer so runoff stays on the outside surface. What should never happen is a reversed overlap where the lower piece sits on top of the upper piece-then water runs “backward” and you get leaks.
Do you always need counter flashings?
Not everywhere, but in many roof-to-vertical transitions they’re the difference between “holds up” and “fails early.” Counter flashings are commonly needed at chimneys, parapet wall transitions, and some wall flashing assemblies because they protect the upper edge of the base metal and handle movement as materials expand and contract. Without them, sealant becomes the primary defense, and that’s unreliable over time-especially with wind-driven rain and seasonal temperature swings.